It is FINISHED!!! Eight years of thinking, planning, strategizing, saving,
waiting, more thinking, more planning, more strategizing, more saving,
more waiting, even more of the thinking, planning, strategizing (this time with a little dreaming thrown in) and more saving, finally taking the plunge to just do it, lining up a contractor, changing choice of projects to do with the saved money, canceling the contractor, a little more planning, lots and lots of hard work, more strategizing and just plain winging it as I went... eight years of all this and finally, FINALLY my kitchen has been redone!
Let me explain:
When Josh and I first got married, we looked into redoing the kitchen (complete with new cabinets, counter top, floor, etc.). After all, it was (and has been) the most used and functional room in the house. Sometimes we have cereal for breakfast, but most of the time, we have three home cooked meals a day out of that kitchen. And I'm not talking peanut butter and jelly or food from a box... REAL food, as in stuff that has to be cooked, meat and potatoes kinds of meals. Plus all the baking I do to fulfill the family's love of fresh baked bread, keep up with my share of the coffee times, goodies just to have for the others to munch on and what I supply on the side (cakes and stuff for people's special occasions). Like I said, when we looked into redoing it the first time, we were just married. Coupled with the fact that Josh had just redone the whole front porch the summer we were married, we were kinda sorta on the just-married-poor side and thinking about kids in the future, we just decided not to splurge on the price tag it would have took. So we waited.
Meanwhile, Caleb came along. And we realized that having such a youngster in an old house with next to no insulation and being able to feel a little breeze blow through every crack near the floor boards and windows that we probably should do something for the warmth of our children... because by the time we decided this, I was pregnant with Sarah Rose. So we arranged to have the three main rooms in our downstairs redone. What a difference new dry wall and a little insulation makes! But that meant we (happily) waited on the kitchen.
Meanwhile, farm projects took over priority the next few years. All the while, I would work in the kitchen and think how nice this would be or what if that was moved over there. It was fun to think of all the different things I could do to the room once we got started. After all, dreaming is part of the fun of it!
Well, this year rolled around and we finally decided to do it! All my big plans were actually going to take effect. We called in our contractor, got a bid, was added to his list of projects and.... waited. And waited. Aaaaaaand waited. Which was actually a blessing in disguise, because amidst all the waiting, a farm project came up that we ended up prioritizing over the kitchen. We couldn't do both the kitchen and the farm project, so I asked Josh to "allow me" to wait on my kitchen so we could do the other project first.
Meanwhile, I started REALLY looking at my kitchen. Thinking about options. Wondering just how much of it I could do myself and before I knew it, I was taking off cabinet doors, requesting power tools be brought in for me from the shop and ripping up old flooring.
I started peeling wallpaper off in January of 2012. Now finally at the beginning of July 2013, the kitchen is nearly done. (Just very minor details that I'll get around to doing in just a bit!) And I must say, as much as I LOVE my 'new' kitchen and as proud as I am that I did it all myself, I will never, EVER do it again!
Possibly if a close friend really wanted theirs done and asked if I could help them.... nope, won't do it. Or maybe if I was offered a hundred million dollars... um, still nope, wouldn't do. I will never, EVER voluntarily do what I just did to my kitchen to another one. (Of course, that's what all women swear through clenched teeth while having babies, too, and we still see people with brothers and sisters... so maybe these vows made during painful, traumatic moments don't really hold true, huh?) Anyway, it was a long, tedious, hard, somewhat painful, lonely yet exciting project that I am SO glad is over with! And I am enjoying the outcome. It's not perfect, but it's mine. I adoringly refer to it as My Old Country Kitchen, 'cause that's exactly what it is and exactly what it looks like!
Without further ado (which is the polite way of saying that I'll stop rambling now), the process:
 |
| I'm terrible at taking "before" pictures. I almost always start in on something before taking the picture. But here's the best one I have. You can see I already started peeling the paper. Much of the paper throughout the kitchen was already starting to peel, so it was a cinch to just peel the top plastic-y layer off. This picture was taken in January 2012. |
 |
| This wall is almost all stripped. I started by using Dif Gel, a commercially produced wall paper remover. It worked so-so. |
 |
I COULD NOT WAIT to pry that chair rail off! Not so much because I didn't like it (I didn't mind it really), but there is some sort of gratification that comes along with destruction for the sake of improvement. Prying it off was fun!
Notice, this picture is still in January. It was at this point that we started the "thinking, planning, strategizing, saving, dreaming" process and decided to hold off for a bit for the sake of doing a complete remodel. Fast forward seventeen months, and I start again....
I don't have pictures, but the first step in restarting was to get the rest of the wall paper off, especially over the toughest area of the kitchen, the soffit. With perfect timing, I had a friend stop by for eggs and inform me that she and her daughters removed her wall paper by using a steam iron. All I can say is BRILLIANT!!! Worked like a charm, with even the hardest of the remaining wallpaper coming off easier than even the easiest of the previously removed stuff (you follow that?). Thank you, Mrs. Lasley!!!! |
 |
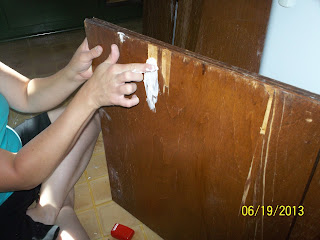
| Before shot of one of the cabinet doors before repairing and painting. At this point, I took off all the cabinet doors and... |
 |
| ...started sanding. |
 |
| Then repairing. |
 |
| With the doors off, I painted the inside of the cupboards a coordinating color of light green to go with the much darker green that would be the outside color. It covered up the really ugly, dark inside of the cupboards with a much prettier brighter color! |
 |
| So I stripped the wallpaper, removed the doors, sanded the doors and painted the inside of the cupboards before I had to ask for help. The next big step was to rip out the little cupboard above the stove, install a microwave/hood combo, and then build a shelf on top of it for storage and to finish it off. This picture shows the insides of the cupboards and the area above the stove after we ripped out the cupboard to make room for the nuker hood. |
 |
| Installing the microwave was something like a three (non-consecutive) day process. I had to grab Josh in his rare spare time of spring field work (notice the date on the picture) to do a little bit at a time. If it wasn't for the electrical work that it involved, I probably would have done this myself, too! |
 |
| The other thing I needed Josh's help with was also electrical: ripping out the old soffit lights and making it ready for new ones. Again, had I not been fearful of deathly electrical shock, I would have done this, too. |
 |
| Random picture: I looked at my counter one mid-morning and this is what I see, a great representation of my days: meat thawing for lunch, dessert made and power tools. |
 |
Back to the doors. The first coat of paint had been been applied to the outside and I thought it would be easier to hang the doors back on to paint the inside. Um.... no! I put a couple of the doors' hardware back on before I realized I was wrong, took them all back off and then painted the inside. THEN I put the hardware on, hung the doors and then stood back to admire my work. This was a many, many days work, working the work in between my normal household duties, taking care of Josh's needs while working in the fields (delivering lunch, running errands, etc.), gardening, spending time with the kids... you get the idea. The kitchen was torn apart for weeks.
By the way, I installed 40 hinges and 26 handles. That adds up to roughly something like 233 screws I screwed in by hand. BY HAND!!!! By. Hand.
Of course, I could have tried to find Josh's drill, the battery packs and the Phillips head. That would have entailed hiking the kids up to the shop, hoping they wouldn't get absolutely filthy while I was looking for all the stuff, getting us all back down to the house, changing and washing the kids up (because let's be honest, it would have taken me a while to find what I need and the kids' favorite shop games do not leave them clean) before getting started on the hinges. Or I could have waited until Josh came in to get it for me... but those were the days he was leaving early in the morning and getting back home at night somewhere between 10:30 and 11:30. I didn't remember to ask and knowing him and his agenda, he wouldn't have remembered to bring it in anyway. OR I could have just grabbed my handy screwdriver and start. I chose the latter.
200+ screws. By hand! |
 |
| Doors on... time to put up the wall paper. I spoke with another friend who gave me tips and loaned me her wall papering supplies before I started. (Thank you, Mrs. Kathy!) I actually really enjoyed this part! |
 |
| Some before and after. |
 |
| This is all the wall paper I had left out of three rolls, which is why.... |
 |
| The wall behind my fridge isn't done. I look at it this way: if I ever start getting unhappy with my beautiful Old Country Kitchen in the future years, when the wall paper starts to peel and the paint starts to chip, I'll just peek behind the fridge to remind myself of what I could be living with! It'll be a reminder to be content with imperfection! |
 |
| Next, changing out the outlets and light switches. See that orange sticker on the switch? It came off my pre-registration bracelet from the hospital when I was pregnant with Caleb. It came off the Sunday morning before Caleb was born while we heading out the door to church and I stuck it to the light switch. I don't know why! Being a hospital bracelet, the thing was SUPER sticky and was stuck there forever since. |
 |
| Again, had to have help with the electrical work. Jolting myself was not on my list of things to do... who would take care of the kids? |
 |
| Next, ripping up the old floor. The old floor that was held together with duct tape in at least six different places. The old floor in which I would have to hammer nails back down through at least every other week. The old floor that, no matter how much I cleaned it, never looked clean. The old floor. |
 |
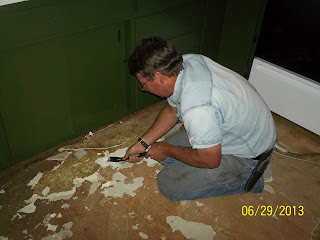
| The beginning. Oh my, was this hard! There was the top layer of vinyl, a layer of underlayment, another layer of vinyl and then another layer of underlayment before the original hardwood floor that was built with the house. My first intention was to rip everything out down to the hardwood, redo the hardwood and fall in love with it just like we have with the hardwood floors in our living and dining room areas. However, the fine art of "winging it" kicked it and once I saw just how many nail holes the original floor was going to have, realized how hard it was prying this stuff up and just how good of shape the first underlayment layer was in, I decided to go ahead and put in new flooring. So that means I ripped out the first layer of vinyl, it's underlayment and the next layer of vinyl down to the first (original and oldest) layer of good underlayment. |
 |
| It was terrible! The top vinyl and it's underlayment wasn't so bad. That underlayment was practically dust and ripped up easy. But the first (oldest) layer of vinyl was a nightmare. They must have used some sort of indestructible adhesive impenetrable by housewives. |
 |
| At the end of the first day, I had about a third of the top vinyl and underlayment up along with all the little nails in the area. The next day, I tore up the rest of the top two layers and then started in on the next layer of vinyl. I got all the way to the appliances before I stopped and had to request Josh's help. I was sore. Very sore. And oh, so tired! Just by chance I caught wind at coffee time that Josh just finished with some major job (can't remember what) and that he wasn't going to start another big project that night. I know he really wanted to start on the highboy (our sprayer) to get it ready, but he was a sweetie and agreed to help me for a bit.... |
 |
| We worked the next couple of hours moving the appliances, ripping that floor up, moving them back, scraping off huge blobs of adhesive off the remaining good underlayment so the new floor would be smooth and.... |
 |
....pulling up hundreds of little nails. Actually, I had all these pulled up already, but he went through and pulled up the few I missed. I really appreciated Josh's help doing the last couple hours of the floor because, like I said, I was exhausted and sore. It means alot that he helped me even though he really wanted to work on his sprayer.
I don't have pictures of the floor after this work but before the new floor, but you can just imagine a light, very smooth plywood look. |
Now, the final product (the pictures don't do it near justice!):
 |
| Overall view. |
 |
| My cute little coffee corner! All the coffee making and coffee fixin' stuff is directly above in the corner cabinet, like a one stop shop place. Genius, right? |
 |
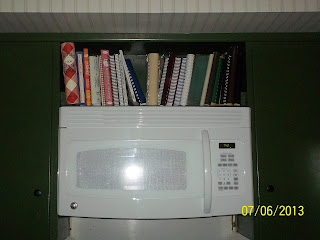
| The new microwave/hood combo, put in above the stove where we ripped out the little cupboard. Then the shelf on top of that holds part of my cook book collection. Those are only the ones that fit in the short area, the rest have found a temporary home in the cabinets until I find somewhere to put them. Many of these I got as a gift, a few I've won as door prizes from different places, some are from Josh's grandmothers, some are freebies and I think one is from my mother's kitchen. Of all my cookbooks, I've only ever bought one... a cookie book I purchased in college, from which I've never made anything! |
 |
| A look at this wall. It came together nicely! |
 |
| This is where my counter top microwave used to be. Look at all that space! The recipe box is from Josh's mother and the bread box is one that he made in high school for his mother that she handed down to our family. |
 |
| My window. It's hard to make out, but the window frame is white, the wood trim around it is the same green from the cabinets and the very outer boarder is white. It turned out really nice. The cute little rooster on the sill is from Josh's grandmother; it holds measuring spoons as its tail. |
 |
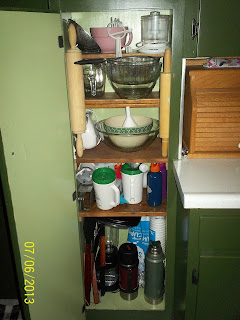
| Another one of my ideas. I built shelves into the tall cupboard that used to hold our garbage can and broom. In it, I put all my baking items, small appliances, coffee time supplies, etc. This may just be my favorite new part of the whole kitchen! |
 |
| Josh's grandmother's hutch fills in this wall quite nicely! |
 |
| Josh's grandmother's shelf holds my small salt and pepper shaker collection. The set on the far left and far right on the top shelf are from his grandmother that owned this shelf, the rest are part of the dish set that his mother began gathering for him before we even knew each other. |
 |
| Let's talk color. I wish my camera had picked up the true colors I painted. It's hard to tell. The color on the left is a light green that's on the inside of the cabinets. The color on the right is obviously the outside darker color. How shall I explain it? The best I can say is that it's the color of a field of corn the week before it tassels (in a good, "normal" year!), that bright popping green that doesn't last forever. Few will understand, but I remember as a teenager sitting by my window looking over the field by our house and noticing for the first time this color. I look for it every year. It's just beautiful. |
 |
| I tried flash, no flash, overhead light, morning light, evening light... nothing worked to capture it. This is the best I got. |
 |
| A look at the wall paper and new outlets! Excited about both, though I miss my little orange sticker. The wall paper pretty realistically resembles old timey white wood paneling. Exactly what I was looking for. |
 |
| Now, the flooring. After the hours of ripping up the old floor and preparing the underlayment, it took another five hours to lay the tile. I got a patterned adhesive tile from Menards and laid it myself. It's not perfect, but it's much better than the $600 I was quoted to have vinyl professionally laid. It turned out nice and unless one looks really hard, you can't notice the imperfections. (By the way, the $600 quote for the flooring would have been more than I spent on the whole rest of the kitchen, including microwave hood, paint, hardware and flooring!) |
The still-to-do:
There are still a few minor to-do's left. I need to put in the cord-around (the floor trim over the vinyl by the cabinet edge). And there's a couple of trim pieces to put in by the microwave in addition to the project below. But for the most part, it's done.
 |
| This picture shows two projects that will finish off the kitchen. The little table that the television is sitting on is going to be replaced by another one of Josh's grandmother's tables. It needs work, so next week I hope to sand it down and refinish it. (Then blog about it!) I think it'll be the perfect addition. Also, the main door is over 100 years old and is original to the house. When I started the kitchen project, it was covered with another piece of veneer (maybe?). I wanted the old door back, so I pulled it off and what was left was glue blobs everywhere. I will eventually get around to refurbishing the door, too, though it might take a little longer to get around to doing seeing as I'll have to take it off the hinges and all. It'll be a big project. |
So there we go, the (mostly) finished kitchen. I'm enjoying it thoroughly! Again, it was a lot of work! But I'm glad I did it. And I'm glad I did almost all of it. It's a good feeling to have accomplished something so major!


No comments:
Post a Comment